Monday, February 22, 2016

Advanced RCcontroller project (BogieRuntRover)

In my previous posts we have seen RCcontroller connect via bluetooth or socketIO but we did not control something cool. This time, we are going to take things to a new level. We will control a little rover with RCcontroller. I don't talk too much so let's get started.

For this project, we need:
  1. A toy car fitted with DC motors. Mine is the BogieRuntRover from ServoCity.
  2. An analog camera. This helps us see where we are going.
  3. A servo gimbal for the camera.
  4. An analog video transmitter-receiver pair. Mine has a range of 2km.
  5. A video capture device. I recommend the Diamond VC500. This will convert the analog video signals to digital so that we can stream the video with our linux computer.
  6. Adafruit's GPS ultimate. Helps us find BogieRuntRover when she gets missing.
  7. Adafruits 10 DOF accelerometer. To give us our robot's euler angles.
  8. Arduino DUE. This will be the brain of BogieRuntRover.
  9. A pair of Xbees. This is for serial communication.
  10. A pair of Xbee adapters to configure and test the xbees. I recommend SainSmart Xbee adapters.
  11. An H-bridge. I recommend the L298 Dual H-Bridge.
  12. 3 11.1V lipo batteries.
  13. A lipo charger. I have the Turnigy Accucel-6.
  14. A custom shield for the Arduino DUE. Get the eagle files here.
  15.  Stackable headers for the shield and some male and female headers.
  16. A few jumper wires.

Get the Arduino code from here.You might also need these libraries.
You can also download the controller JSON file (for RCcontroller): BogieRuntRover.json
Download with your smartphone and open it with RCcontroller to automatically load the controller.

 See the video below to know how everything looks after setup:


This video shows BogieRuntRover in action:


LInux Video Streaming

In this post, we are going to see how we can stream from our computer's webcam or any usb camera connected to the computer. We will further create a hotspot for other computers to connect to and access the video stream. Finally, we would do some port forwarding and access the video stream via the internet with some basic http authentication. This turns our linux computer into an ip camera (which is basically a linux computer).


For this demonstration we need the following:

  1. An android smartphone with RCcontroller installed. (Might not be required)
  2. A linux computer (Eg: desktop/laptop, beaglebone black, raspberry pi, intel galileo/edison). 
  3. A port forwarding capable router. (Might not be required)


Let's get started. First, we update the package repositories:


sudo apt-get update


We then install motion (A video streaming application for linux)

sudo apt-get install motion


If you want motion to automatically start running after boot, change the file /etc/rc.local by add sudo motion before exit 0 like so:

sudo motion
exit 


Now let's configure motion:
Make the following configuration changes in the file /etc/motion/motion.conf

###########################################################
# Capture device options
############################################################
videodevice /dev/video0     <-------- Your video device. Find this
                                                                        through: ls /dev/video*

norm 0                      <-------- Video format.


width 320                   <-------- Device resolution width.

height 240                  <-------- Device resolution height.

framerate 30                <-------- Device framerate.


############################################################
# Image File Output
############################################################
output_pictures off         <-------- Turn off saving of pictures to
                                                                        hard drive. (Very annoying if
                                                                        you're only streaming !!!)


############################################################
# FFMPEG related options
# Film (movies) file output, and deinterlacing of the video input
# The options movie_filename and timelapse_filename are also used
# by the ffmpeg feature
############################################################

# Use ffmpeg to encode movies in realtime (default: off)
ffmpeg_output_movies off        <-------- Turn off saving stream to                                                                                                                         video


############################################################
# Text Display
# %Y = year, %m = month, %d = date,
# %H = hour, %M = minute, %S = second, %T = HH:MM:SS,
# %v = event, %q = frame number, %t = thread (camera) number,
# %D = changed pixels, %N = noise level, \n = new line,
# %i and %J = width and height of motion area,
# %K and %L = X and Y coordinates of motion center
# %C = value defined by text_event - do not use with text_event!
# You can put quotation marks around the text to allow
# leading spaces
############################################################

text_right %Y-%m-%d\n%T-%q  <-------- Delete everything after
                                                                        text_right if you don't want to
                                                                        see timestamp.


############################################################
# Live Stream Server
############################################################

stream_port  2020            <-------- Stream port.

stream_maxrate 30           <-------- Maximum stream rate. (Should
                                                    be the same as framerate for
                                                                        consistency).

stream_localhost off        <-------- Has to be off in order not to
                                                                        restrict streaming to just
                                                                        localhost.

# Set the authentication method (default: 0)
# 0 = disabled
# 1 = Basic authentication
# 2 = MD5 digest (the safer authentication)
stream_auth_method 1

# Authentication for the stream. Syntax username:password
# Default: not defined (Disabled)
stream_authentication Joachim:helloWorld 


That's all for the configuration. I know you wouldn't add this line.

Start motion by typing into the terminal:

sudo motion

 
To access the stream on the same computer to test it out, just type into the browser the url:

localhost:2020

You would be prompted to enter a username and password.


You can now do port forwarding on your router to your linux computer at port 2020 and stream the video from anywhere with internet connection.

For those of you who don't have a router, we can make a router with our linux computer. Let's do it!


Setup the wifi hotspot:

Let's download hostapd to help us configure the wifi adapter as a hotspot and isc-dhcp-server to take care of assigning ip addresses to connected clients

sudo apt-get install hostapd isc-dhcp-server -y


To make a wireless access point, edit the file /etc/hostapd/hostapd.conf to this

# Define network interface. Note: choose the appropriate wireless
# interface. Mine is wlan0. Find out with by typing ifconfig into the terminal
interface=wlan0
# Set the network driver
driver=nl80211
# Choose an access point name
ssid=MyVidStream
# Set access point harware mode to 802.11g
hw_mode=g
# Choose WIFI channel (can be easily changed)
channel=6
# Type of encryption: WPA2 only (1 for WPA, 2 for WPA2, 3 for
# WPA + WPA2)
wpa=2
# password
wpa_passphrase=simplepass


Give the wireless interface a static ip address to make sure it doesn't change everytime the hotspot is set up. Do this by adding to /etc/network/interfaces:

auto wlan0
iface wlan0 inet static
address 192.168.6.1


To make the hotspot set configure itself on start up, we simply make the hostapd daemon run after boot. Do this by editing the file /etc/default/hostapd as follows:
# Defaults for hostapd initscript
#
# See /usr/share/doc/hostapd/README.Debian for information about alternative
# methods of managing hostapd.
#
# Uncomment and set DAEMON_CONF to the absolute path of a hostapd configuration
# file and hostapd will be started during system boot. An example configuration
# file can be found at /usr/share/doc/hostapd/examples/hostapd.conf.gz
#
RUN_DAEMON="yes"
DAEMON_CONF="/etc/hostapd/hostapd.conf"

# Additional daemon options to be appended to hostapd command:-
#   -d   show more debug messages (-dd for even more)
#   -K   include key data in debug messages
#   -t   include timestamps in some debug messages
#
# Note that -B (daemon mode) and -P (pidfile) options are automatically
# configured by the init.d script and must not be added to DAEMON_OPTS.
#
DAEMON_OPTS="-dd"


Setup the dhcp server to assign ip addresses to connected clients by commenting out the following lines in /etc/dhcp/dhcpd.conf

# option definitions common to all supported networks...
#option domain-name "example.org";
#option domain-name-servers ns1.example.org, ns2.example.org;

#default-lease-time 600;
#max-lease-time 7200;


#Finally to restrict the range of ip addresses assigned to clients

#we choose the range from 192.168.6.2 to 192.168.6.20 (up to 18 clients)

subnet 192.168.6.0 netmask 255.255.255.0 {
  range 192.168.6.2 192.168.6.20;
  option routers 192.168.6.1;
}


Restart the computer after all this configuration

Watching the video:

 
Connect a client to the network (the ssid name you chose) and enter
password.
 

Open a browser or streaming app and enter the url;
http://192.168.6.1:2020 or just 192.168.6.1:2020 in a browser
<protocol>://<ipaddress>:<port number>


See the video below for a demonstration:


RCcontroller SocketIO communication


For this demonstration we need the following:


  1. An android smartphone with RCcontroller installed.
  2. A linux computer (Eg: desktop/laptop, beaglebone black, raspberry pi, intel galileo/edison). You need to install the following node pakcages: socketio, socketio-auth, and express.
  3. A port forwarding capable router.
Access the nodejs code here.


See the video below for demonstration:


Sunday, February 21, 2016

RCcontroller bluetooth communication


For this demonstration we need the following:


  1. An android smartphone with RCcontroller installed.
  2. A bluetooth radio. I use Sparkfun's BlueSmirf silver.
  3. An arduino. I'm using UNO.
  4. Some jumper wires.
Download the Arduino code here.

Follow these videos to test RCcontroller's bluetooth communication:


Saturday, February 20, 2016

Intro to RCcontroller


As an open source hardware enthusiast who loves to control my hardware with an android phone, I have endured the pain of having to write a new application for every hardware project I make. I finally decided to write a single app that would be able to control almost any device I can dream of building. Of course I can do that if I have a micro-controller on the remote device doing wireless serial communication with an android phone. Android’s switches and buttons represent ON/OFF controls while the like of a seekbar represents PWM control. I call my app, RCcontroller™.

RCcontroller™ is an android application for remotely controlling and monitoring a hardware device via Bluetooth, WiFi or USB radio. Researchers, hobbyists and students can build their own controller consisting of buttons, switches, joysticks, etc. to control a device they have built. This is one of the most versatile and easy-to-use app for IoT and robotics. It is a complete WYSIWIG tool and requires no programming experience all to use. Just drag and drop controls onto the screen, select your mode of communication and you are done. You can now not only control your device but track its location, stream video from it (if your remote device has a camera) and do other forms of parameter monitoring. Each controller is basically a JSON file defining the number of controls and parameters as well as their properties. You can build and sell your hardware and all users need to do is to download your controller and they can now control what you have built.
Let’s now move on to all the features of the app and how we can create our own controller in less than 10 minutes
When we first open the application, we are asked for storage permissions. You must accept this in order to save recorded video. We then see a 
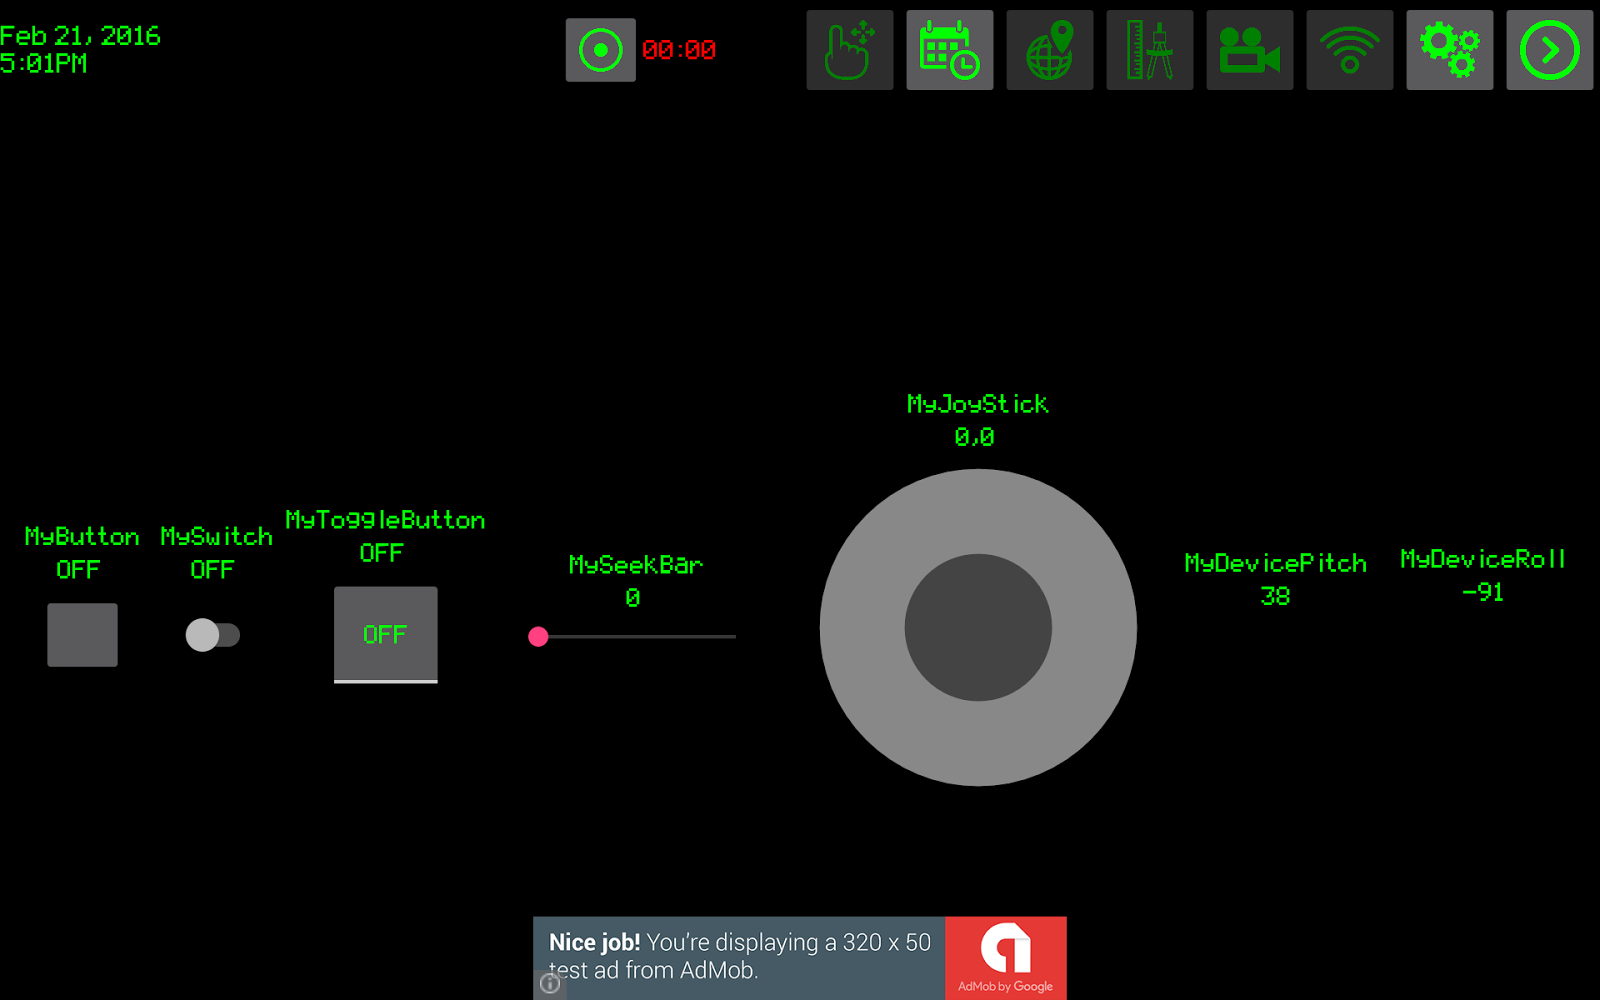
dark screen like this: 

Control Centre:


  1. Calendar: Displays current time and date.
  2. Record screen: This is used to record the screen. Useful for when you want to record a video stream.
  3. Toggle drag controls: Allows you to drag and drop controls to preferred location on the screen.
  4. Toggle display calendar: Allows you to show/hide calendar.
  5. Toggle map display: Used to show/hide map. For a controller to support maps, it needs to have longitude and latitude as part of its parameter list.
  6. Toggle OSD graphics display: Shows/Hides OSD graphics. To show the azimuth dial and compass, you should have Azimuth as part of the parameter list. To show pitch/roll dial, you should have pitch/roll as part of the parameter list.
  7. Toggle MJPEG video streaming: Starts or stops streaming MJPEG video.
  8. Toggle wireless communication: Engages/Disengages communication with remote device via Bluetooth, WiFi or USB radio.
  9. Open Settings: Starts the setting activity where you can share, edit, copy, delete controllers or add a new one. You also select the currently active controller from this activity.
  10. Toggle action bar visibility: This shows/hides all the buttons in order to make the screen emptier.
  11. Control area: The whole dark area is valid to contain all your controls and parameters as well as stream video with the controls on the surface.


Control Types:


  1. Button: Value is either on/off. Sends a 1/0 to remote device.
  2. Switch: Value is either on/off. Sends a 1/0 to remote device.
  3. ToggleButton: Value is either on/off. Sends a 1/0 to remote device.
  4. SeekBar: Sends values ranging from supplied min to max values to remote device.
  5. JoyStick: Sends values as pan,tilt (x,y coordinate of joystick thumb with relative to the joystick view) to remote device.
  6. DevicePitch: Sends the smartphone’s pitch in landscape mode to the remote device. The format of this control can only be frequent.
  7. DeviceRoll: Sends the smartphone’s roll in landscape mode to the remote device. The format of this control can only be frequent.
     
 The textView above each control is the name of the control and the next text view is the value. The value textView tells you the control's value (which is sent to the remote device).


 Control Format:

Note: Before I make any progress, I want to say there is a video demonstration of everything on this page, so if you don't understand, the video might help.

The control format is defined by how often the control values are sent (wirelessly) to the remote device. The order in which the values are sent is based on the order in which you added the controls when you were setting up the controller. The control format can either be seldom or frequent.

Seldom control values are only sent to the remote device when at least one of these control values changes. The command payload, ie, the data that is sent to the remote device has a prefix of “S” and a suffix of “\n”. So based on the number of controls, say 3 switches, the command payload, using random values, will be something like this: “S0,9,1\n”

Frequent control values are sent to the remote device after every delay interval. So if we are using either Bluetooth, WiFi or USB radio and the Bluetooth delay, WiFi delay or the USB transceiver delay is set to 50 ms, the frequent control values will be sent to the remote device every 50 milliseconds. This command payload has a prefix of “F” and a suffix of “\n”. So based on the number of controls, say 3 switches, the command payload, using random values, will be something like this: “F0,9,1\n”.

Note: A joystick sends two values; pan and tilt. So if we have for example a joystick followed by a button as frequent controls, the payload, using random values, will be like this: “F0,0,0\n”. With the first two values representing the pan and tilt of the joystick and the last value representing the state of the button either 1 or 0.

Parameters are values sent from the remote device to RCcontroller, on your smartphone. This would eventually show up as a list on the top right corner of the Control Center. The payload has a “P” prefix and “\n” suffix so, using random values, with 3 parameters being sent to RCcontroller, the payload should look like this: “P0,9,100\n”.


Enough with the theory, we can now do really cool stuff. Based on the kind of communication you want to perform with a remote device, click on one of the following links to see how RC controller works. Navigate to the bluetooth example post on the right pane.